Android; Continuous integration, all made lovely with Maven
Lets face it, the eclipse ADT plugin is great for getting an android application up and running quickly, but if you want an easier way to get libraries, and a continuous intergration environment for robust automated testing and building, then maven is the way to go.
IntelliJ have recently released the Early Access Program to their version X of IDEA, this comes with Android support in the community edition, meaning we’re no longer bound to using eclipse for Android development!
The first thing you want to do, is to run through the “create new project” wizard in IntelliJ, its fairly straightforward, just run through and setup a simple android applicaiton. When you’ve got that, run it up on the emulator just to make sure any autogenerated code IntelliJ created works OK.
OK so now we’re ready to start gutting it out and providing the Maven framework. First thing you need to do, in the root directory of the android project, create a file called pom.xml with the following contents
<project xmlns="http://maven.apache.org/POM/4.0.0" xmlns:xsi="http://www.w3.org/2001/XMLSchema-instance"
         xsi:schemaLocation="http://maven.apache.org/POM/4.0.0 http://maven.apache.org/maven-v4_0_0.xsd">
    <modelVersion>4.0.0</modelVersion>
    <groupId>com.example</groupId>
    <artifactId>MavenMess</artifactId>
    <version>1.0-SNAPSHOT</version>
    <packaging>apk</packaging>
    <name>Maven Android Plugin - samples</name>

    <dependencies>
        <dependency>
            <groupId>com.google.android</groupId>
            <artifactId>android</artifactId>
            <version>2.2.1</version>
            <scope>provided</scope>
        </dependency>
    </dependencies>

    <build>
        <finalName>${project.artifactId}</finalName>
        <sourceDirectory>src</sourceDirectory>
        <plugins>
            <plugin>
                <groupId>com.jayway.maven.plugins.android.generation2</groupId>
                <artifactId>maven-android-plugin</artifactId>
                <version>2.6.0</version>
                <configuration>
                    <sdk>
                        <!--  platform or api level (api level 4 = platform 1.6)-->
                        <platform>8</platform>
                    </sdk>
                    <emulator>
                        <!--  the name of the avd device to use for starting the emulator-->
                        <avd>GoogleAPIs</avd>
                    </emulator>
                    <deleteConflictingFiles>true</deleteConflictingFiles>
                    <undeployBeforeDeploy>true</undeployBeforeDeploy>
                </configuration>
                <extensions>true</extensions>
            </plugin>
            <plugin>
                <artifactId>maven-compiler-plugin</artifactId>
                <!--  version 2.3 defaults to java 1.5, so no further configuration needed-->
                <version>2.3</version>
            </plugin>
        </plugins>
    </build>
</project>
The POM file is what maven uses to build/test your project. If you’re not familiar with maven at this stage I’d suggest a quick browse of their documentation to get to grips with the fundamentals.
The above POM does a couple of tasks, firstly it tells maven to build an APK file using the packaging statement. You need this otherwise maven wouldn’t know what to create, and might create a WAR or EAR file instead.
You declare the android SDK as a provided dependancy. Next comes the build section, this is where the magic happens. The source directory tells maven where it can find all your android source files to compile.
You’ll need to declare usage of the Jayway plugin, this is a neat little plugin that I picked up from Hugo Josefson from Jayway, at DroidCon UK 2010. There is some configuration that you can set here such as the API level and which emulator to deploy the application to. The second plugin is the maven Java compiler, we need this in order to actually compile the class files.
Right so thats your POM sorted, next you can go ahead and delete the following items
- \bin
- \libs
- build.properties
- build.xml
You won’t need those files/directories, those are used for the autogenerated ant build script that the android IntelliJ plugin creates, and we’re now using maven.
Right thats it for the maven configuration, next comes actually running the application. The maven goal of “mvn install” will compile all your classes, so run that to check the above is OK.
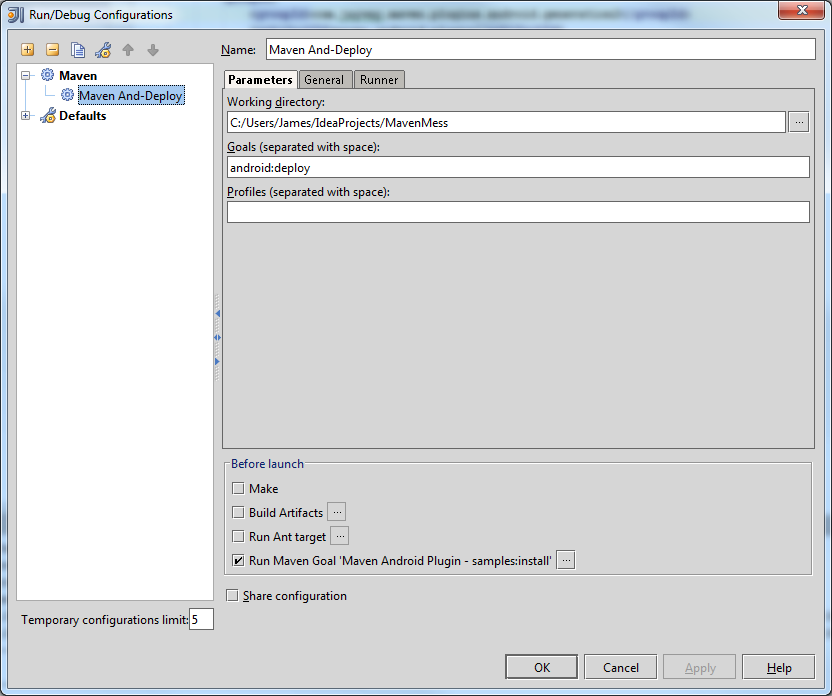
To deploy your application to a device, you can run the maven goal of “mvn android:deploy”. These goals are great, but what about a 1 button click for building and deploying? Easy…
Along the top of IntelliJ, click on the drop down menu for run targets and create a new run/debug configuration. Using the goal of “android:deploy” will deploy the application to the emulator, but you can also setup a goal of “mvn install” which happens before deployment, as shown in the screenshot below. This will build and deploy your application to the emulator with one click.

All you need to do then is to go into your emulator and start your application, simple!
Any questions/suggestions, please let me know!
Big thanks to the guys at Jayway for sharing this, and making it possible.