Non volatile storage (NVS) and custom partitioning the ESP32 with LittleFS
The problem
Another Friday night hacking session, and one of the questions I wanted to answer tonight, is how to do persistent storage on the esp32. My projects so far have been quite simple, and configuration items like the Wifi SSID and password were just stored in variables. Even the certificates and private keys for AWS IoT were also just stored as variables, which has been working perfectly fine.
I’ve been thinking about OTA updates, and what would happen if I had many devices that needed the same code, for example if I had a temperature sensor in the house, and one outside the house. Both devices would have identical hardware, and both devices would share a codebase. But how would I do an OTA update if the device name and certificates was hardcoded?

Fortunately, with the esp32, you can partition it’s memory, like you would a hard drive on your desktop, you can create a separate partition for “configuration” that doesn’t get overwritten when you flash new code. This is exactly what I need, the code can be parameterised to read from config files.
Setting up partitions
Initially, I wanted to use the littleFS plugin for the Arduino IDE, but I couldn’t get it to work, it seems that the plugins aren’t supported by version 2.x of the IDE.
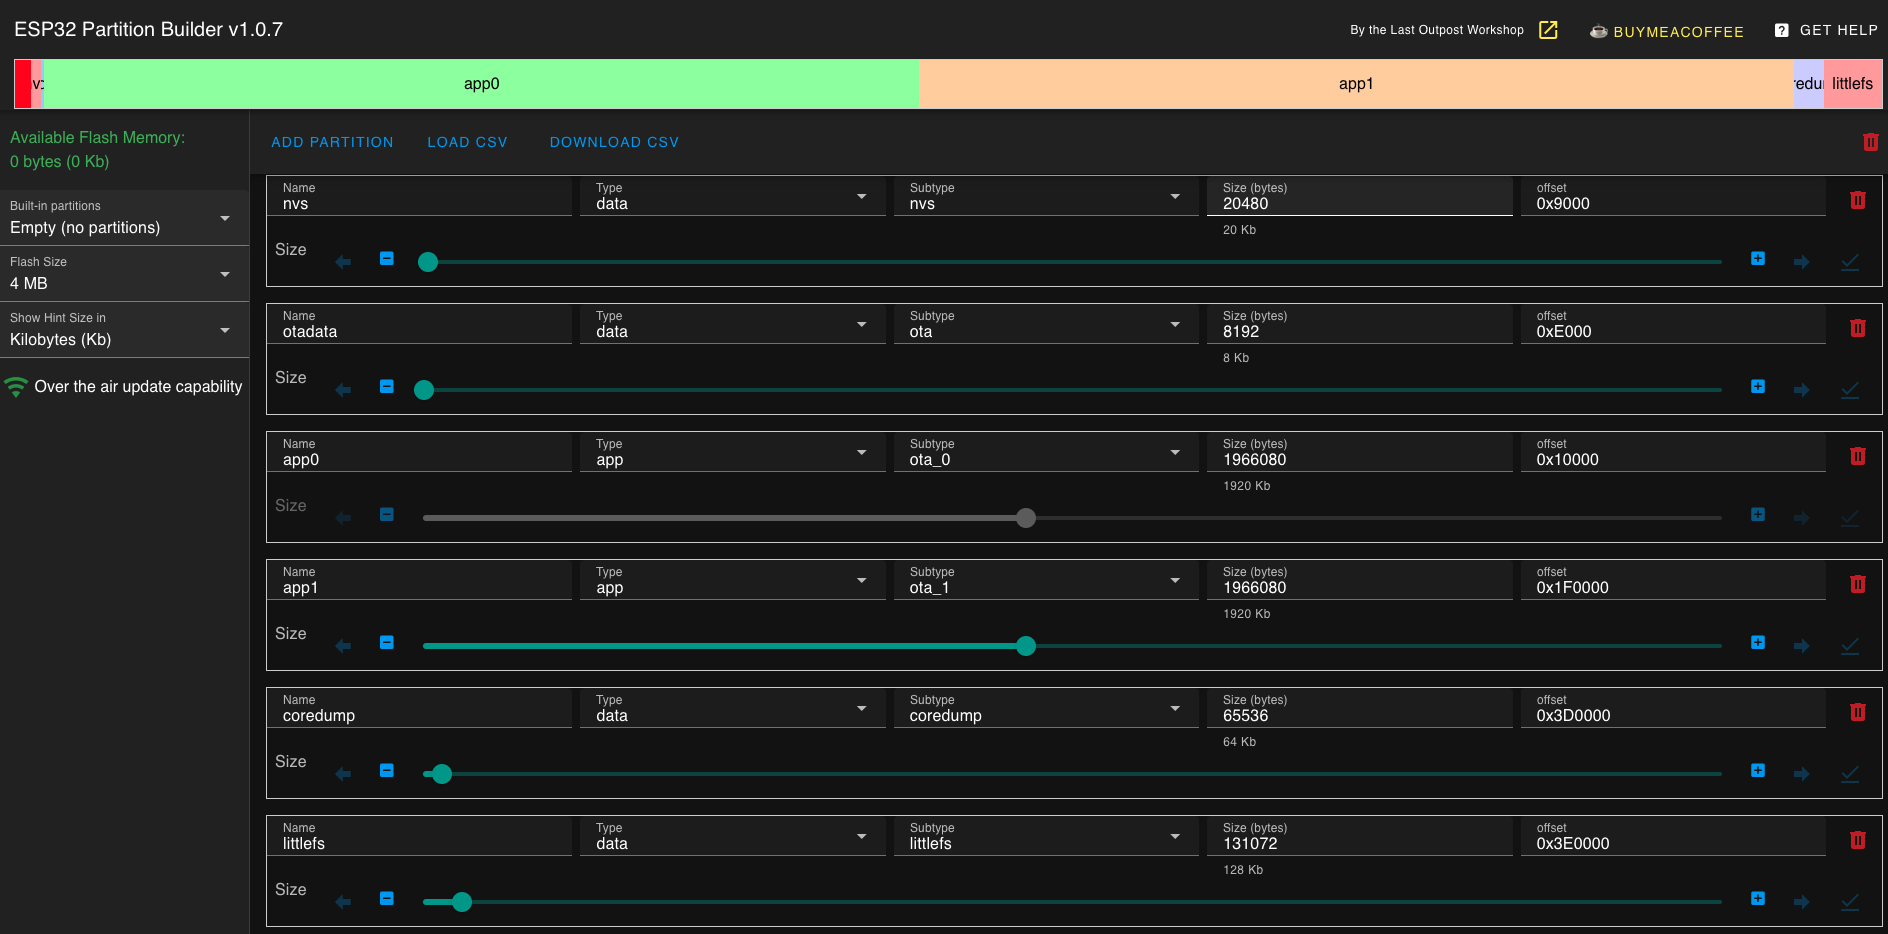
I stumbled upon this video that explains how you can do it manually, with some help from a web UI to get your partitions right. This is what I settled on, I have the 2 partitions to support OTA updates, but then I also have a 128kb littlefs data partition.
You can access the partition builder here.

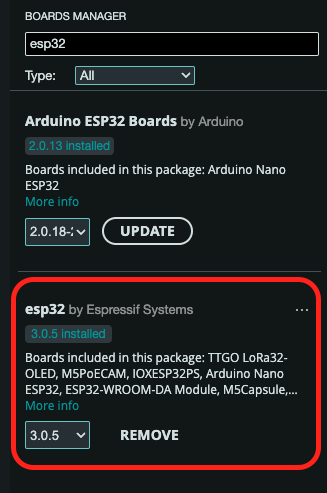
As per the video, I downloaded the partitions.csv to my project folder. You must ensure that you have at least version 3 of the esp32 board manager by Espressif Systems in Arduino, then set the partitioning type to Custom in the Arduino IDE. I then deployed the code to the esp32 to set this up.

Verifying the partitions
How could I check that the partitions were setup? There isn’t an easy way via the Arduino IDE, but we can use the parttool.py to help us. I installed it via the esp-idf tools on Github
We can use the parttool.py to get the info about a named partition, since we named it littlefs, lets see what it finds
parttool.py --port /dev/cu.usbserial-02A98D2F get_partition_info --partition-name littlefs

Running /Users/jameselsey/.espressif/python_env/idf5.5_py3.13_env/bin/python /Users/jameselsey/Documents/Arduino/esp-idf/components/esptool_py/esptool/esptool.py --port /dev/cu.usbserial-02A98D2F read_flash 32768 3072 /var/folders/tp/mw_3dvqj00ggfpxsytxrnzf40000gn/T/tmpnxr6ipz9...
esptool.py v4.8.1
Serial port /dev/cu.usbserial-02A98D2F
Connecting.......
Detecting chip type... Unsupported detection protocol, switching and trying again...
Connecting......
Detecting chip type... ESP32
Chip is ESP32-D0WD-V3 (revision v3.1)
Features: WiFi, BT, Dual Core, 240MHz, VRef calibration in efuse, Coding Scheme None
Crystal is 40MHz
MAC: 48:e7:29:b7:f5:48
Uploading stub...
Running stub...
Stub running...
Configuring flash size...
3072 (100 %)
3072 (100 %)
Read 3072 bytes at 0x00008000 in 0.3 seconds (87.0 kbit/s)...
Hard resetting via RTS pin...
0x3e0000 0x20000
Take note of the last line, 0x3e0000 0x20000, this is the offset and size (128kb) of the littlefs partition, which aligns with the partitions csv.
We can also do the same for one of the other partitions, like app1 and confirm the sizes and offsets match
parttool.py --port /dev/cu.usbserial-02A98D2F get_partition_info --partition-name app1

Running /Users/jameselsey/.espressif/python_env/idf5.5_py3.13_env/bin/python /Users/jameselsey/Documents/Arduino/esp-idf/components/esptool_py/esptool/esptool.py --port /dev/cu.usbserial-02A98D2F read_flash 32768 3072 /var/folders/tp/mw_3dvqj00ggfpxsytxrnzf40000gn/T/tmp23p882x7...
esptool.py v4.8.1
Serial port /dev/cu.usbserial-02A98D2F
Connecting....
Detecting chip type... Unsupported detection protocol, switching and trying again...
Connecting.....
Detecting chip type... ESP32
Chip is ESP32-D0WD-V3 (revision v3.1)
Features: WiFi, BT, Dual Core, 240MHz, VRef calibration in efuse, Coding Scheme None
Crystal is 40MHz
MAC: 48:e7:29:b7:f5:48
Uploading stub...
Running stub...
Stub running...
Configuring flash size...
3072 (100 %)
3072 (100 %)
Read 3072 bytes at 0x00008000 in 0.3 seconds (87.3 kbit/s)...
Hard resetting via RTS pin...
0x1f0000 0x1e0000
I also found that if you go to Tools > Core Debug Level > Verbose, then deploy your app, you’ll get this output in the serial monitor that also confirms the partitions
------------------------------------------
Partitions Info:
------------------------------------------
                nvs : addr: 0x00009000, size:    20.0 KB, type: DATA, subtype: NVS
            otadata : addr: 0x0000E000, size:     8.0 KB, type: DATA, subtype: OTA
               app0 : addr: 0x00010000, size:  1920.0 KB, type:  APP, subtype: OTA_0
               app1 : addr: 0x001F0000, size:  1920.0 KB, type:  APP, subtype: OTA_1
           coredump : addr: 0x003D0000, size:    64.0 KB, type: DATA, subtype: COREDUMP
           littlefs : addr: 0x003E0000, size:   128.0 KB, type: DATA, subtype: LITTLEFS
Writing to the littlefs partition
Now the partition is there, lets get some config onto it. Unfortunately the plugins for Arduino IDE that should make this easy, no longer work with version 3.x, so we need to use an alternative way.
Firstly, lets wrap up our data/ directory into a bin file, using the mklittlefs too. You can download this from github, I didn’t have any luck building from source on my mac, but fortunately they provide releases that you can download for your architecture, just be sure to allow it in your Mac system settings, it’ll be blocked by default since it doesn’t come from the Apple store.
# -c: Path to your data/ directory.
# -b: Block size (default: 4096 bytes).
# -p: Page size (default: 256 bytes).
# -s: Total size of the LittleFS partition (match your partition size: 128 KB = 131072 bytes).

./mklittlefs -c ~/dev/jameselsey/home-automation/demos/littlefs/littlefs/data -b 4096 -p 256 -s 131072 littlefs_image.bin

skipping .DS_Store
/config.json
/certs/66d2ccc0773981aed-snip-public.pem.key
/certs/AmazonRootCA3.pem
/certs/AmazonRootCA1.pem
/certs/66d2ccc0773981aed-snip-private.pem.key
/certs/66d2ccc0773981aed-snip-certificate.pem.crt
Now we can flash the bin file into the littlefs partition using the esptool.py tool. (make sure you omit the python from the start of the command, otherwise you’ll get an error BlockingIOError: [Errno 35] Resource temporarily unavailable)
esptool.py --chip esp32 --port /dev/cu.usbserial-02A98D2F write_flash 0x3E0000 ~/dev/tools/mklittlefs/littlefs_image.bin

esptool.py v4.8.1
Serial port /dev/cu.usbserial-02A98D2F
Connecting......
Chip is ESP32-D0WD-V3 (revision v3.1)
Features: WiFi, BT, Dual Core, 240MHz, VRef calibration in efuse, Coding Scheme None
Crystal is 40MHz
MAC: 48:e7:29:b7:f5:48
Uploading stub...
Running stub...
Stub running...
Configuring flash size...
Flash will be erased from 0x003e0000 to 0x003fffff...
Compressed 131072 bytes to 5021...
Wrote 131072 bytes (5021 compressed) at 0x003e0000 in 1.1 seconds (effective 965.2 kbit/s)...
Hash of data verified.

Leaving...
Hard resetting via RTS pin...
Reading config from the littlefs partition at runtime
Ok so now everything is in place, we can start to write some code that will read the configuration file. This is where I started
#include <ArduinoJson.h>
#include "FS.h"
#include <LittleFS.h>

#define FORMAT_LITTLEFS_IF_FAILED true

void setup() {
  // Initialize Serial Monitor
  Serial.begin(115200);
  while (!Serial);

  // Initialize LittleFS
  if (!LittleFS.begin(true, "/littlefs")) {
    Serial.println("Failed to mount LittleFS");
    return;
  }

  // Open the config.json file
  File configFile = LittleFS.open("/config.json", "r");
  if (!configFile) {
    Serial.println("Failed to open config.json");
    return;
  }

  // Read the file contents into a string
  String fileContent = "";
  while (configFile.available()) {
    fileContent += char(configFile.read());
  }
  configFile.close();

  // Parse the JSON
  StaticJsonDocument<512> jsonDoc; // Adjust the size if needed
  DeserializationError error = deserializeJson(jsonDoc, fileContent);
  if (error) {
    Serial.print("Failed to parse JSON: ");
    Serial.println(error.c_str());
    return;
  }

  // Extract and print the value of "thingName"
  const char* thingName = jsonDoc["thingName"];
  if (thingName) {
    Serial.print("thingName: ");
    Serial.println(thingName);
  } else {
    Serial.println("thingName not found in config.json");
  }
}

void loop() {
  // Nothing to do here
}
Running this, I kept getting an error on initialising littlefs, I couldn’t figure out why, I was doing it exactly as the examples I found online, and ChatGPT was hallucinating and giving me invalid advice. I could not work out where “spiffs” was being referenced, it was only when I clicked into the begin method and saw that the signature has more parameters, with the partition label being defaulted to spiffs.
E (569) esp_littlefs: partition "spiffs" could not be found
E (569) esp_littlefs: Failed to initialize LittleFS
[   731][E][LittleFS.cpp:82] begin(): Mounting LittleFS failed! Error: 261
bool begin(bool formatOnFail = false, const char *basePath = "/littlefs", uint8_t maxOpenFiles = 10, const char *partitionLabel = "spiffs");
Changing my code to this, fixed the issue
  // Initialize LittleFS
  if (!LittleFS.begin(true, "/littlefs", 10, "littlefs")) {
    Serial.println("Failed to mount LittleFS");
    return;
  }
Deploying the same code, to 2 devices, whilst retaining their config on the littlefs partition
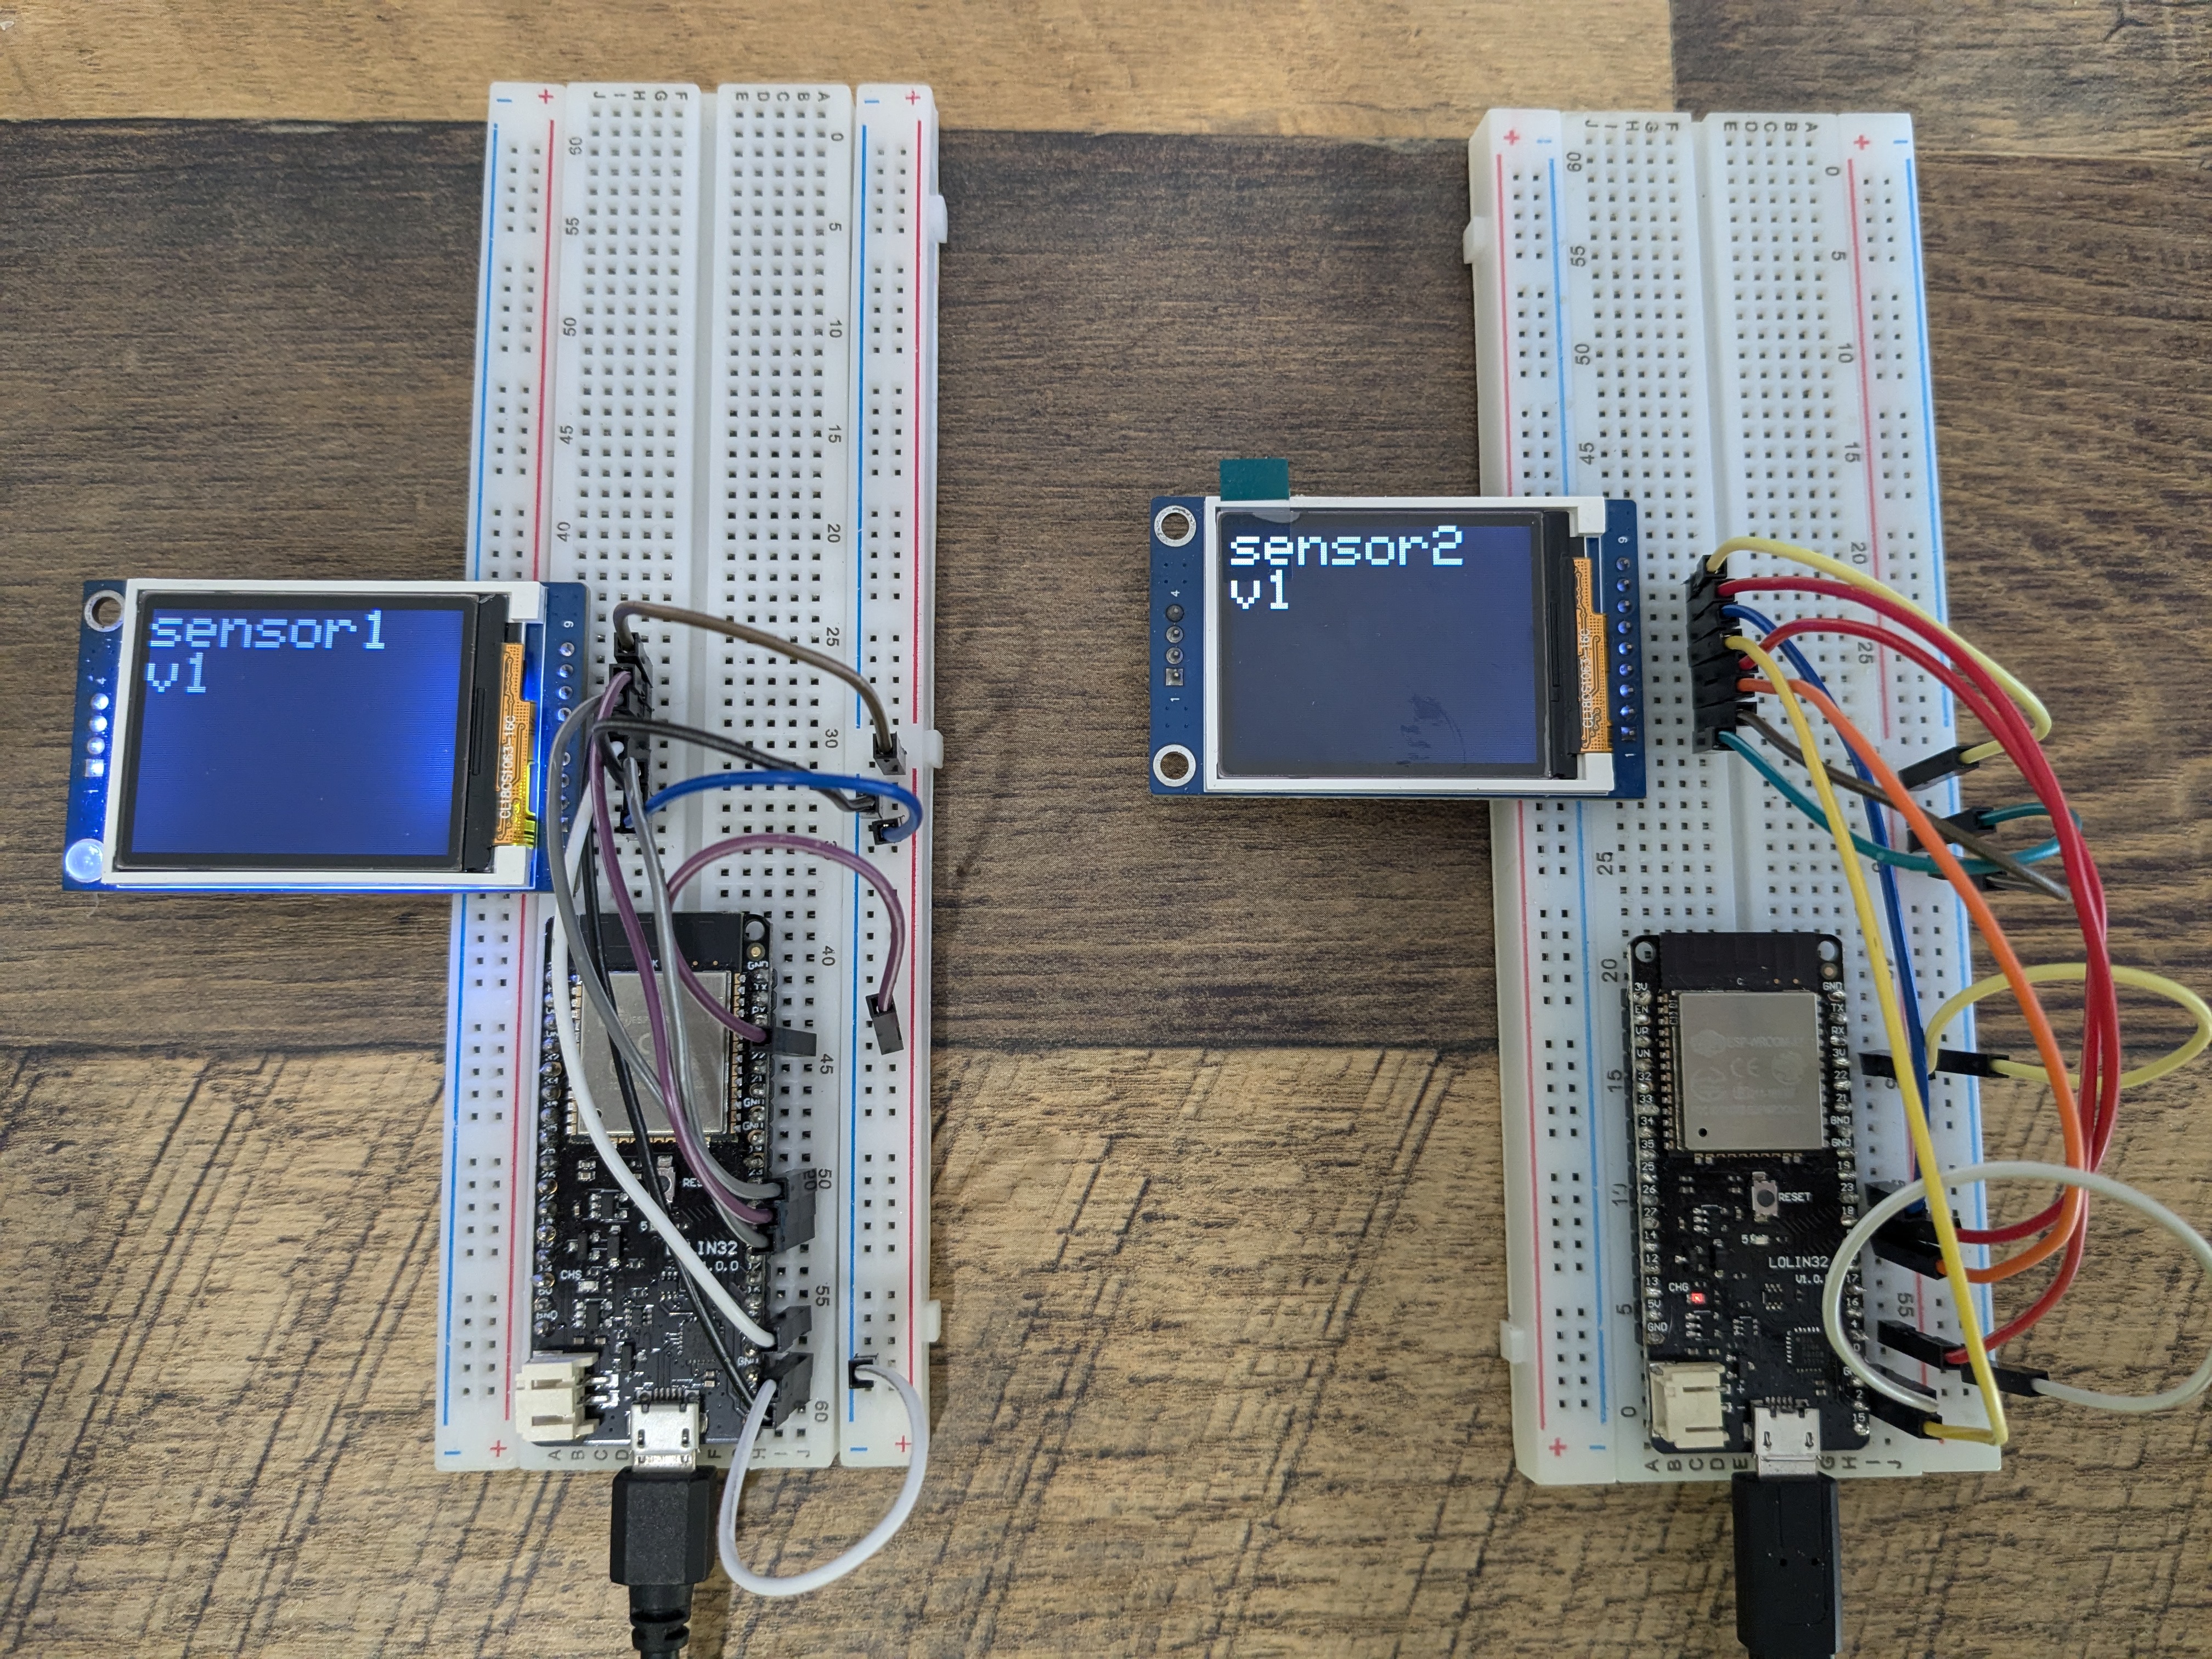
Now let’s put it all together, in this section we’ll deploy the same code to 2 different devices. The code will not have any configuration hardcoded, but will instead read from the config files on the littlefs partitions.
To make it easier to demo, I’m going to use a TFT screen on each device, and it’ll display the thingName from the config file. I’ll deploy the same code to both devices, but with different config files on the littlefs partitions.
Here’s the code that I deployed to the devices, note the thingName coming from config
// libs for littlefs
#include <ArduinoJson.h>
#include "FS.h"
#include <LittleFS.h>

// libs for tft
#include <Adafruit_GFX.h>        // Core graphics library
#include <Adafruit_ST7735.h>     // Library for ST7735
#include <SPI.h>

// Define pins for the display
#define TFT_CS         5  // Chip Select
#define TFT_RST        4  // Reset
#define TFT_DC         2  // Data/Command

// Initialize the ST7735 display
Adafruit_ST7735 tft = Adafruit_ST7735(TFT_CS, TFT_DC, TFT_RST);

void setup() {
  // Initialize Serial Monitor
  Serial.begin(115200);
  while (!Serial);

  // Initialize LittleFS
  if (!LittleFS.begin(true, "/littlefs", 10, "littlefs")) {
    Serial.println("Failed to mount LittleFS");
    return;
  }

  // Open the config.json file
  File configFile = LittleFS.open("/config.json", "r");
  if (!configFile) {
    Serial.println("Failed to open config.json");
    return;
  }

  // Read the file contents into a string
  String fileContent = "";
  while (configFile.available()) {
    fileContent += char(configFile.read());
  }
  configFile.close();

  // Parse the JSON
  StaticJsonDocument<512> jsonDoc; // Adjust the size if needed
  DeserializationError error = deserializeJson(jsonDoc, fileContent);
  if (error) {
    Serial.print("Failed to parse JSON: ");
    Serial.println(error.c_str());
    return;
  }

  // Extract and print the value of "thingName"
  const char* thingName = jsonDoc["thingName"];
  if (thingName) {
    Serial.print("thingName: ");
    Serial.println(thingName);
  } else {
    Serial.println("thingName not found in config.json");
  }


  // Initialize the display
  tft.initR(INITR_BLACKTAB);  // Init ST7735S chip
  tft.setRotation(1);         // Set the display rotation

  // Set the display background color to black
  tft.fillScreen(ST77XX_BLACK);

  // Print a message on the display
  tft.setTextColor(ST77XX_WHITE);
  tft.setTextSize(3);
  tft.setCursor(0, 0);
  tft.println(thingName);
  tft.println("v1");

}

void loop() {
  // Nothing to do here
}

Closing thoughts
This post went on far longer than I anticipated, but it was a wild ride and I learned a lot, which is the main thing I was looking for.
The ability to partition the esp32 memory is great for having thousands of the same device, or even persisting things like application state or counts during power cycles. It’s a bit tricky to do manually, but it’s one of those things that once you’ve done it, you shouldn’t need to do it again for the device.
Where am I going next? Well, I need to hit AliExpress and get some more esp32s, but my plan is to create a few temperature sensors around the property. Next I want to experiment with AWS IoT jobs, to see if I can deploy to all my temperature sensors via a github action, that would be cool.
